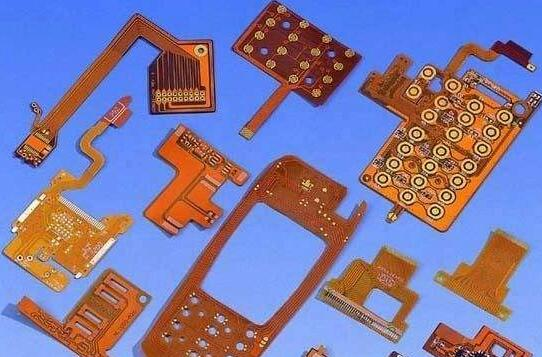
The PCB and SOC package design is a bit like this, which means that it is indeed a combination of parts, circuit interfaces, power planes, thousands of signals, via conversion and many needs to be combined and perform electrical sound, with the required performance The design rules consist of difficult problems, and it can also handle the constraints and limitations of mechanical form factors.
The cornerstone of PCB design
The importance of following a good input checklist
Having an input list allows engineers to think about and create a form of communication in the form of a record, and basically make the ball roll. The checklist can define many things and provide us with a starting point for the PCB design journey. This is also the time for the engineer to reflect on what he is looking for in the design. So far, engineers have been thinking about electrical issues in most cases, and have been immersed in schematics and parts search (hopefully), now is the time to start physics, haha. Meaning, start thinking about how the electrons will flow on the PCB and what is needed.

The more designs you make, the more it boils down to muscle memory. If you are a layout engineer, your mind will be more curved, and now you think like a PCB designer. For example, you may now consider reference codes more than part numbers. You will conduct a feasibility study very early and enter the checklist to start this phase. The basic items required are BOM, mechanical input, wiring/design rules, total thickness, impedance requirements, and minimum spacing components to help define the required through-hole structure and do BGA math.
Collaboration with MCAD is essential to start the project. It is important to be consistent with the mechanical requirements from the beginning. The total board thickness, connector position/rotation, placement forbidden area and mounting holes must be accurately defined and considered in the early stages of PCB design. This is the foundation of the building you are going to build. Frames are available to fit the physical constraints and dimensions of the design, so you can see that accuracy is critical to the success of the design. I have seen in the past that the mechanical board outline from MCAD shows the bottom view and enters the ECad in the top view. This will affect the placement of the parts. Don't do this. Make sure your view is correct, and share the .idf or .idx file as much as possible, and if you have this capability, include the same step model file. This will ensure successful MCAD collaboration. In addition, it may now be necessary to negotiate where to move the radiator mounting holes, but component placement will also determine the restrictions. For example, if it is recommended to put your high pin count BGA in the corner and it completely fills the signal, then it is time to postpone it, because you will be trapped trying to route from the corner and need more signal layers.
Importance of routing rules
Wiring or design rules are the key to controlling PCB circuit board design. I often refer to the documented rules as the train tracks that the train must pass. Rules are defined in a document, and many emails change every day or hour and are difficult to track, so it is easy to go off track and miss or forget items that are critical to design performance, and allow PCB designers to communicate and provide legacy Documentation. The concept of rules in document form is used to populate rules in CAD tools, usually called constraints or design rules, and the design must comply with these rules. This includes the physical and electrical rules that the design will follow to meet timing, noise, and manufacturing requirements.
High-speed routing and simulation-power supply concept
Now that the design has begun to take shape, the rules are in place, the layout and power planes are being defined, now is a good time to lay out the most critical interfaces and the most challenging high-speed circuits (if they exist in your design). It is a good idea to have a stack that applies to the entire design. Using standard via sizes and trying to achieve a good yield aspect ratio, it’s time to test the circuit, layout and routing, and then simulate. Yes, once the critical network wiring is complete, run a simulation now to see if you meet the requirements for optimal performance. It is at this point that you may find that you need a different stackup or through-hole configuration. For example, if you are trying to reach 12GBPS and you use through holes on an 18-layer 0.093-thick board, you may find that stubs cause excessive reflections to achieve performance.such as blind and buried vias or back drilling or different board stacking and interface options.
The four steps I described above should lay the foundation for a successful PCB design framework. My experience following these steps helps produce consistent results. I think it's important to develop a framework first. In the next step, is the simulation successful? Do you need to change the PCB design board configuration or through-hole structure or through-hole size or manufacturing material with lower Dk and lower loss? You can learn a lot from the simulation, which will help pave the way forward.
Once simulations or calculations have been performed, and after the initial critical routing/adjustment of the high-speed interface, all these items should disappear. So, if everything is normal, what is the next step? Where do we go from here? Confirm stacking? Design organization?
Layout planning according to design rules
Use Via mode/layout for wiring transition and planning
Advanced SOC chip design and how to use SIP or SOC to plan PCB design.