After disassembling the cover of the current computer keyboard, only one circuit board of about 5mmx3mm and two PTFs replacing the original circuit board can be seen.
In the past two days, I saw that the computer keyboard that was used for a long time was buried, so I disassembled the computer keyboard to clean it, but unexpectedly discovered that the current computer keyboard has actually cost down to the highest point, which originally accounted for the highest price of all costs. The size of the circuit board has been greatly reduced to less than one-twentieth (1/20) of the original. The integrated circuit above has also been changed from the original packaged IC to a cheaper COB, and even the connection method is also From the original actual connector (connector) to "press connection (press connection)" instead of welding, I think the cost of such a computer keyboard should be less than US$2.0.
All in all, seeing the cost of computer keyboards nowadays is so slim, it really shocked me. After disassembling the back cover of the current computer keyboard, only the following materials can be seen:
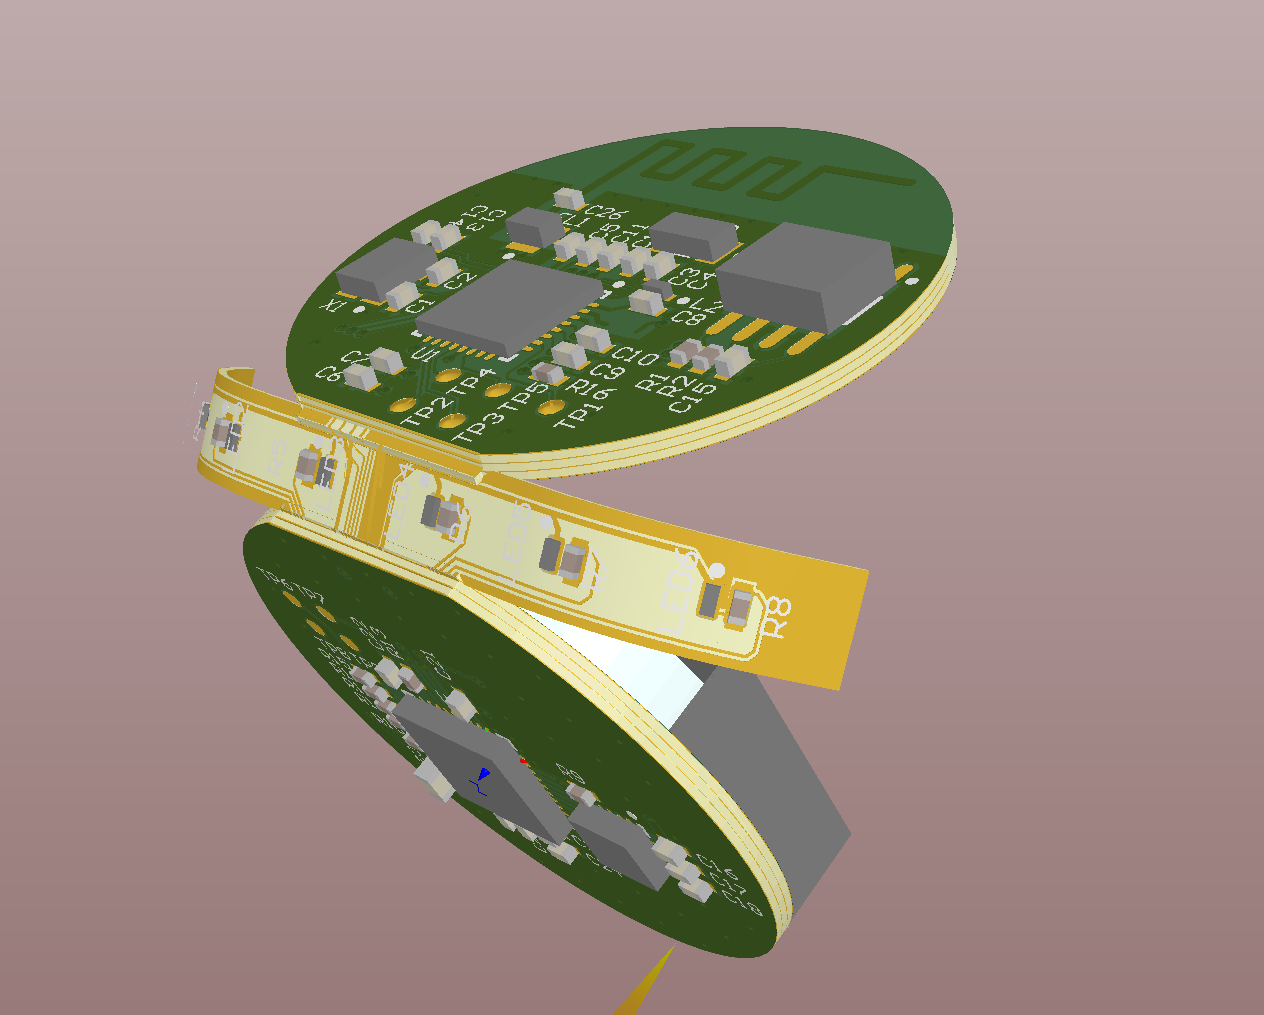
1. A circuit board of about 5mmx3mm, with a COB on the back of the circuit board, three LEDs and a few traditional plug-in parts on the front.
2. Two PTFs to replace the button circuit of the original PCB circuit board.

3. A piece of rubber button membrane (membrane).
4. The rest are the plastic keys and the upper and lower shells of the keyboard, and of course the screws are also included.
Save the keyboard circuit board that can't be saved
There is only a 5mmX3mm circuit board left on this piece. There is a COB on the back, which should be the processing chip for the buttons. The rest is the hand-soldered external connection line; the front is all traditional plug-in parts, which counts as three LED lights., Two electrolytic capacitors, five ceramic capacitors, two capacitors, resistance, one inductor, plus two jumpers. The soldering process should be the COB first, and then the entire wave soldering (wave soldering), I personally suggest to change all traditional parts into SMD parts, try not to use hand soldering to control the quality of PCBA circuit board assembly .
Save the keyboard circuit board that can't be saved Save the keyboard circuit board that can't be saved
Use PTF to replace the PCB button circuit
I have disassembled the computer keyboard before. At that time, the keyboard button circuit was still using a single-layer large circuit board. The button circuit I saw this time has been changed to use PTF (Polymer Thick Film)., This is a technology that uses conductive inks (conductors such as silver paste) to be printed on PET materials. The price of this kind of PTF is much cheaper than that of PCB, but the reliability is also relatively poor. If you want to know more about PTF, you can refer to this article: Introduction to PTF (Polymer Thick Film)
However, PTF alone cannot replace the original golden finger button circuit. Polydome technology similar to Metal dome is also used here. Look carefully at the first picture below. There is a circular opening next to the circular node. This opening raises the contact point line of the keyboard keys.
Use press connection to replace connectors or soldering
Generally speaking, the connection method between the soft board and the PCB is nothing more than the use of connectors, soldering (such as HotBar), or conductive glue (such as HSC, ACF), but such direct use of press connection (press connection) ( The name I chose) is the most cost-effective connection method. I think it is actually a bit similar to conductive zebra strips. It actually uses a flexible material (such as rubber, rubber foam) to connect the soft board. Squeeze to connect to the PCB. This keyboard uses silicone rubber on the contact fingers between the PCB board and the PTF, and then an iron sheet is attached to the cover as a support, and finally the screws are fixed to the plastic case.
This saves the cost of connectors and the work of welding. However, the direct contact between silver paste and gold will cause migration problems in the long run.
Use press connection to replace connectors or soldering
The elliptical hole allows the positioning plunger on the membrane to be inserted and used for tightly fitting positioning.
Use the positioning cylinder to tightly fix the rubber membrane (membrane) to the plastic
Rubber membrane (membrane) is between the plastic keyboard and the circuit. If the positioning is lost, the function of the keys will be affected. We used to design screws to fix the membrane. The method of "matching", because the rubber has the characteristics of expansion and contraction, so the larger rubber plunger can be fixed in the smaller plastic hole, so that the material and man-hours of the screw can be saved.
This design also has an ingenuity. In order to insert the rubber plunger into the plastic hole, the plastic hole is specially designed to be an oval hole, so that the rubber column can be easily inserted into the plastic hole, and it can also be used for fixing purposes. It is really smart the design of.
The elliptical hole allows the positioning plunger on the membrane to be inserted and used for tightly fitting positioning. The positioning cylinder of the rubber membrane (membrane) can be used to insert the oval hole in the plastic for the most tight fitting positioning.