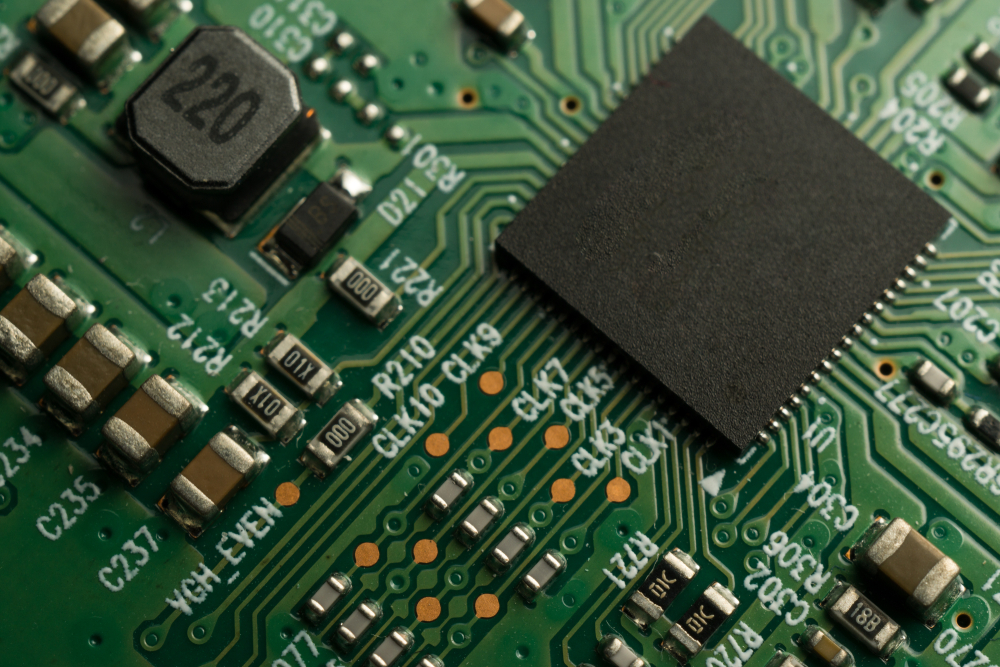
Nowadays, the factors considered in PCB board design are more and more complex, such as clock, crosstalk, impedance, detection, manufacturing process, etc., which often make designers repeat a lot of layout, verification and maintenance work. The Parameter Constraint Editor can formulate these parameters to help designers better handle these sometimes even opposing parameters during the design and production process. In recent years, the requirements for PCB board layout and wiring have become more and more complex, and the number of transistors in integrated circuits is still increasing at the speed predicted by Moore's Law, which makes the device faster and the rise time of each pulse edge shortened. At the same time, the number of pins also increases. More and more, often to 500 to 2,000 pins. All of this creates density, clocking, and crosstalk issues when designing a PCB. A few years ago, most PCB boards had only a few "critical" nodes (nets), usually referring to some constraints in impedance, length, and clearance. PCB board designers generally performed these traces first. Manual wiring, and then use software to automatically route the entire circuit on a large scale. Today's PCB boards often have 5,000 or more nodes, and more than 50% of them are critical nodes. Due to time-to-market pressures, manual routing is no longer possible at this time. Furthermore, not only has the number of critical nodes increased, but so have the constraints on each node. These constraints are mainly due to parameter dependencies and increasingly complex design requirements. For example, the spacing of two traces may depend on a function of node voltage and board material. Digital IC rise time decreases. Both high clock speed and low clock speed designs will have an impact. The setup and hold times are shorter due to faster pulse generation. In addition, interconnect delay is an important part of the total delay of high-speed circuit design. It is also very important for low-speed designs, etc. Wait. Some of the above problems would be easier to solve if the board could be designed a little bigger, but the current trend is just the opposite. Circuit boards are getting smaller due to interconnect delays and high-density packaging requirements, resulting in high-density circuit designs that must follow miniaturization design rules. The combination of reduced rise time and these miniaturization design rules has made the problem of crosstalk noise more and more pronounced, while ball grid arrays and other high-density packages themselves can exacerbate problems such as crosstalk, switching noise, and ground bounce.

Fixed constraints exist
The traditional way to deal with these problems is to translate electrical and process requirements into fixed constraint parameters by experience, default values, tables or calculations. For example, when designing a circuit, an engineer may first determine a rated impedance, and then "estimate" a rated line width that can achieve the required impedance according to the process requirements, or use a calculation table or arithmetic program to test the interference, and then find the length constraints. . This approach usually requires devising a set of empirical data as a basic guideline for the PCB board designer, which can be utilized when designing with automatic place and route tools. The problem with this approach is that empirical data is only a general principle, and most of the time they are correct, but sometimes they don't work or lead to wrong results. Let's take the example of impedance determination above to see the errors this method can cause. Factors related to impedance include the dielectric properties of the circuit board material, the height of the copper foil, the distance from each layer to the ground/power layer, and the line width. Since the first three parameters are generally determined by the production process, designers usually rely on the line width. to control impedance. Since each circuit layer has a different distance from the ground or power layer, it is obviously wrong to use the same empirical data for each layer. The problem is compounded by the fact that the production process or board characteristics used during development may change at any time. Most of the time, these problems will be exposed in the prototyping stage, which is usually solved by repairing the circuit board or redesigning the board after finding the problem. This is expensive, fixes often introduce additional issues that require further debugging, and the lost revenue due to delays in time-to-market is far greater than the cost of debugging. Almost every electronics manufacturer faces this problem, and it boils down to the fact that traditional PCB board design software cannot keep up with the current reality of electrical performance requirements, at this point it is not as simple as empirical data on mechanical design.
Solution: Parametric Constraints
Design software vendors are currently trying to solve this problem by adding parameters to constraints. The beauty of this approach is that it can specify mechanical specifications that fully reflect the various internal electrical characteristics, and as long as it is added to the PCB design, the design software can use this information to control automatic placement and routing tools. When the subsequent production process changes, there is no need to redesign. The designer only needs to simply update the process characteristic parameters to automatically change the relevant constraints. Designers can then run a DRC (design rule check) to determine if the new process also violates other design rules, and to find out what aspects of the design should be changed to correct any errors. Constraints can be entered in the form of mathematical expressions, including constants, various operators, vectors, and other design constraints, providing designers with a parametric rule-driven system. Constraints can even be entered in the form of look-up tables, storing them in the design file on the PCB or schematic. PCB board routing, copper foil area locations, and layout tools must comply with the constraints generated by these conditions. DRC verifies whether the entire design complies with these constraints, including line width, spacing, and space requirements (such as area and height constraints), etc. . A very simple example is the rise time constraint, which is generally set to a constant 1.5ns. According to this condition, the trace length constraint can be obtained, that is, 5,800mil/ns times the rise time of 1.5ns. A slightly more complex example is the element spacing, which is determined by multiplying the tangent of the detection angle by the device height, which gives the element spacing value.
Hierarchical management: A major benefit of parametric constraints is that they can be handled hierarchically. For example, the global line width rule can be used as a design constraint in the entire design. Of course, there are individual regions or nodes that cannot copy this principle. At this time, the high constraints can be bypassed and the low-level constraints in the hierarchical design can be used.
1) Design constraints for all objects without other constraints.
2) Hierarchical constraints for objects on a certain layer.
3) Node type constraints for all nodes contained in a certain type.
4) Node constraints, used for a certain node.
5) Inter-class constraints, which represent constraints between two types of nodes.
6) Space constraints for all devices in a space.
7) Device constraints, for a certain device.
Example 1: Line width = f (impedance, layer spacing, dielectric constant, copper foil height)
Here is an example of how parametric constraints can be used as design rules to control impedance. As mentioned earlier, the impedance is a function of the dielectric constant, the distance to the near-circuit layer, the width and height of the copper line. Since the impedance required by the design has been determined, these four parameters can be arbitrarily taken as the relevant variables to rewrite the impedance formula, in most cases the only parameter that the designer can control is the line width. Because of this, the constraints on line width are a function of impedance, dielectric constant, distance to near-line layers, and copper foil height. If the formula is defined as a level constraint and the manufacturing process parameters are defined as a design level constraint, the software will automatically adjust the line width to compensate when the designed line layer changes. In the same way, if the designed circuit board is produced by another process and the copper foil height is changed, just changing the copper foil height parameter in the design level will cause the relevant rules in the level to be automatically recalculated.
Example 2: Device interval = max(default interval, f(device height, detection angle)
The obvious benefit of using both parametric constraints and design rule checking is that the parametric approach is very portable and monitorable when the design is modified. This example shows how the device spacing is determined by process characteristics and test requirements. The above formula indicates that the device spacing is a function of device height and inspection angle. Usually the detection angle is a constant for the entire board, so it can be defined at the design level. When the inspection is changed to a different machine, the entire design can be updated simply by entering new values in the design level. After entering the new machine performance parameters, the designer can simply run the DRC to check whether the device spacing conflicts with the new spacing value to know if the design is feasible, rather than analyzing and correcting and then requiring a hard calculation for the new spacing Much easier.
Example 3: Component Layout
In addition to organizing design objects and constraints, design rules can also be used for component placement, which means that it can detect where to place devices based on constraints without introducing errors. The highlighted part in Figure 1 is the device placement area that meets physical constraints (such as spacing from board edges and device spacing, etc.), and Figure 2 highlights the device placement area that meets electrical constraints, such as trace length, Figure 3 Only the area that satisfies the space constraint is shown, Figure 4 is the intersection of the parts in the first 3 figures, this is the effective layout area, and the devices placed in this area can satisfy all the constraints. In fact, generating constraints in a modular fashion can greatly improve their maintainability and reusability. New expressions can be generated by referring to the constraint parameters of the different layers of the previous stage, such as the top layer line width depending on the distance and copper line height of the top layer and the variables Temp and Diel_Const in the design level. Note that design rules are displayed in ascending order, and changing a high constraint will immediately affect all expressions referencing that constraint.
Design reuse and documentation
Not only can parametric constraints significantly improve the initial design process, but they are also more useful for engineering changes and design reuse. Constraints can be part of the design, system, and documentation, if not just in the mind of the engineer or designer , then they may slowly forget when they move on to other projects. Constraint documents document the electrical performance rules that should be followed during the design process and provide others with an opportunity to understand the designer's intent so that these rules can be easily applied to new manufacturing processes or changed based on electrical performance requirements. Future reusers can also know the exact design rules and make changes by entering new process requirements without having to guess at issues such as how line widths are obtained. The Parametric Constraint Editor facilitates PCB board layout and routing under multi-dimensional constraints, again enabling auto-routing software and design rules to be fully checked against complex electrical and process requirements, rather than just experience or simple, useless designs rule. The result is a successful PCB board design that reduces or even eliminates prototyping.