Print out the drawn circuit board with transfer paper, pay attention to the slippery side facing you, generally print two circuit boards, that is, print two circuit boards on one sheet of paper. Choose the circuit board with the best printing effect among them.
Cut copper clad laminate
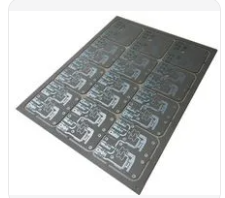
Use the photosensitive plate to make the whole process diagram of the circuit board. Copper clad laminate, that is, a circuit board covered with copper film on both sides, cut the copper clad laminate to the size of the circuit board, not too large to save materials.
Pretreatment copper clad laminate
Use fine sandpaper to polish off the oxide layer on the surface of the copper clad laminate to ensure that the carbon powder on the thermal transfer paper can be firmly printed on the copper clad laminate when transferring the circuit board. The standard for polishing is that the surface of the board is bright without obvious Stains.
Cut the printed circuit board to a suitable size, stick the printed circuit board on the copper clad laminate, put the copper clad laminate into the heat transfer machine after alignment, and make sure that the transfer paper is not misaligned when placing it. Generally, after 2-3 times of transfer, the circuit board can be transferred firmly on the copper clad laminate. The heat transfer machine has been preheated in advance, and the temperature is set at 160-200 degrees Celsius. Due to the high temperature, pay attention to safety during operation!

Corrosion circuit board
First check whether the printed circuit board is completely transferred. If there are a few areas that have not been transferred, you can use a black oil-based pen to repair it. Then it can be corroded. When the exposed copper film on the circuit board is completely corroded, the circuit board is removed from the corrosive solution and cleaned, so that a circuit board is corroded. The composition of the corrosive solution is concentrated hydrochloric acid, concentrated hydrogen peroxide, and water in a ratio of 1:2:3. When preparing the corrosive solution, discharge water first, and then add concentrated hydrochloric acid and concentrated hydrogen peroxide. Be careful of splashing on the skin or clothes and wash them with clean water in time. Because of the use of strong corrosive solutions, you must pay attention to safety during operation!
PCB drilling
The circuit board needs to be inserted with electronic components, so it is necessary to drill the circuit board. Choose different drill pins according to the thickness of the electronic component pins. When using the drill to drill, the circuit board must be pressed firmly. The drill speed cannot be too slow. Please carefully watch the operator's operation.
Circuit board pretreatment
After drilling, use fine sandpaper to polish off the toner on the circuit board, and clean the circuit board with water. After the water dries, apply rosin to the side with the circuit. In order to speed up the solidification of the rosin, we use a hot air blower to heat the circuit board, and the rosin can solidify in only 2-3 minutes.
Double-sided tin plate/immersion gold plate production process:
Cutting----Drilling-----Sinking Copper----Line---Picture Electric----Etching-----Solder Mask---Character----Spray Tin ( Or heavy gold)-gong edge-v cut (some boards don't need)--flying test-vacuum packaging
Production process of double-sided gold-plated plate:
Cutting----Drilling-----Sinking Copper----Lines----Pictures---Gold Plating----Etching----Solder Mask----Characters-- ---Gong edge---v cut---Fly test---Vacuum packaging
Multilayer tin plate/immersion gold plate production process:
Cutting----Inner layer-----Laminating----Drilling---Sinking copper----Lines---Picture electricity----Etching-----Solder mask ---Character----Spray tin (or heavy gold)-Gong edge-V cut (some boards don’t need)-----Fly test----Vacuum packaging
Multi-layer plate gold plate production process:
Cutting----Inner layer-----Laminating----Drilling---Sinking copper----Lines---Picture electricity----Gold-plating----Etching-- --Solder Mask--Character---Gong Edge---v Cut---Fly Test---Vacuum Packaging
Anatomy processedit
1. Remove the components on the original board.
2. Scan the original board to get the graphic file.
3. Grind the surface layer to obtain an intermediate layer.
4. Scan the middle layer to get the graphic file.
5. Repeat steps 2-4 until all layers are processed.
6. Use special software to convert graphic files into electrical relationship files---PCB diagrams. If you have the right software, the designer only needs to trace the graphics once.
7. Check and check to complete the design.
Layout editor
The details of the layout design should be noted as follows:
Single panel
This type of panel is usually used when the cost is lower. In layout design, sometimes components or jumper wires are needed to skip the traces of the circuit board. If there are too many, you should consider using double panels.
Double panel
The double-sided board can be used with or without PTH. Because the PTH board is expensive, it will only be used when the complexity and density of the circuit require it. In the layout design, the number of wires on the component side must be kept to a minimum to ensure that the required materials are easily available.
In PTH boards, plated through holes are only used for electrical connection and not for component installation. For economic and reliability considerations, the number of holes should be kept to a minimum.
To choose single-sided or double-sided, it is very important to consider the surface area (C) of the components, and the ratio of it to the total area of the printed circuit board (S) is an appropriate constant ratio. The installation is useful. It is worth noting that "US" usually refers to the area of one side of the panel.
Introduction
The relationship between the diameter of the pad and the width of the maximum wire is required when the circuit board is made, so that the circuit board, circuit board, PCB board factory, aluminum substrate, high-frequency board, PCB, etc. can be made.
Relationship between typical pad diameter and maximum wire width
Pad diameter (inch/Mil/mm) maximum wire width (inch/Mil/mm)
0.040/ 40 /1.015 0.015/ 15 /0.38
0.050/ 50 /1.27 0.020/ 20 /0.5
0. 062/ 62 /1.57 0.025/ 25 /0.63
0.075/ 75 /1.9 0.025/ 25 /0.63
0.086/ 86 /2.18 0.040/ 40 /1.01
0.100/100/2.54 0.040/40/1.01
0.125/125/3.17 0.050/50 /1.27
0.150/150/3.81 0.075/75/1.9
0.175/175/4.44 0.100/100/2.54
Production issuesedit
Design check, the following checklist includes all aspects related to the design cycle, for special: the application should also add some other items.
1) Has the circuit been analyzed? Is the circuit divided into basic units to smooth the signal?
2) Does the circuit allow short or isolated key leads?
3) Where must be shielded, is it effectively shielded?
4) Have you made full use of the basic grid graphics?
5) Is the size of the printed board the best size?
6) Do you use the selected wire width and spacing as much as possible?
7) Has the optimal PCB pad size and hole size been used?
8) Are the photographic plates and sketches appropriate?
9) Is the use of jumper wires the least? Do jumper wires pass through components and accessories?
l0) Are the letters visible after assembly? Are their size and model correct?
11) In order to prevent blistering, is there a window on the large area of copper foil?
12) Are there tool positioning holes?